Before uploading the first documents to urCollection, we recommend you to have them well classified. A good files organization is obtained by arranging them by folders and subfolders from your own computer.
urCollection, the app for sales force, is so useful that you can put your documents inside the app in exactly the same way you had them stored on your computer.
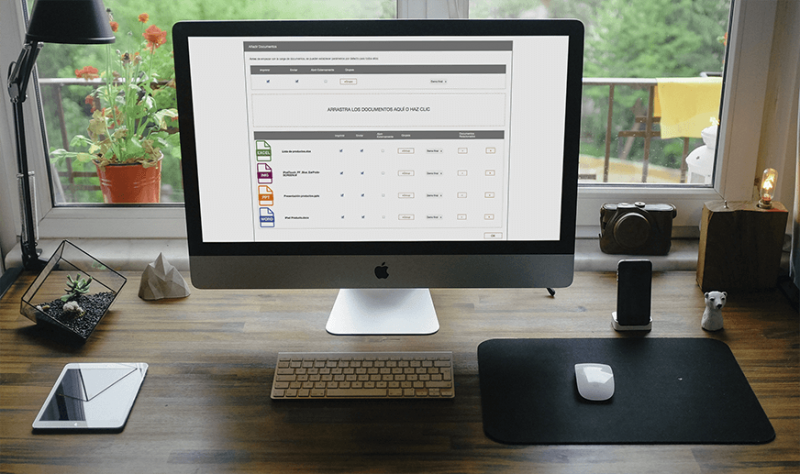
“The documents you upload to the web administration panel are the ones the sales force will see later on their devices”
If it is the first time you access the web portal urCollection, before uploading a document to our document manager you must create, at least, one Folder/Category to store there your files.
If you want to know how to create a Category you can read about it here: Improve your documents’ organization: urCollection’s categories.
Once the Categories folder is created, click on the Add Documents tab. The following points include all you need to know in order to upload documents to urCollection:
A) While we upload documents
1. By default-parameters of the document manager
You can establish by default-parameters for all the files you are going to upload at once.
1.1 Establish Permissions
With the permissions you can choose what actions users can do with the documents you upload in that moment. These are all types of urCollection’s permissions:
Print: Sales force can synchronize the mobile device with a printer and print the file
Send: Sales force can send the document by email to other people
Open Externally: Sales force can open the document with other external apps. This permission is very useful if your company has documents in special formats that can only be opened with special apps
1.2 Assign user groups
Inside the by default-parameters, you can also decide what Group or User Groups will see those documents in their tablets.
If you have not created any User Group, we recommend you to check this article before: How to create a User Group?
2. Upload files from a computer
Once the by default-parameters are defined, upload the files by selecting in your computer the ones you need and dragging them to the web portal. You can also do it in the conventional way, clicking on the documents’ uploading space and selecting the ones you want.
3. Edit documents’ properties
Once you have the documents uploaded to the platform, you can edit the Licenses and the User Groups to which each file belongs individually.
4. Change a document’s cover
If you want to select other image that would be more representative of the content than the cover uploaded by default, you can do it by clicking on the image that appears on the left side and choosing the one you like the most.
5. Assign related documents
At this point you can also choose the related documents that each file will have. As its name implies, the related documents are those files that have a certain relation with other files. That is to say, those files that complement a file’s information and we want to have quickly available.
“Related documents make the access to other companion file faster without the need to search it”
For instance, if the main file were a product’s image, its related documents would be the different rates of this product, its introductory video, the different images of this product in other colors, etc.
6. How to know that the files have been uploaded correctly
Files are uploaded when you drag or select them, provided that there’s no loading error
In case you have uploaded a file that you don’t need by mistake, you have the chance of deleting it by clicking the small red cross. You can also upload more documents if you have forgotten to upload some.
The loading process of documents finishes when you click the OK tab on the left side. Then, the category’s webpage will reload and you will see all the new documents appear.
B) Once documents are uploaded
1. Change a file’s name
If you want to change the name of some file in a quick and easy way, you just have to click on the file with the right mouse button and choose the first option: Change the name.
2. Modify a document’s position
To change the position of a document inside the same Category/Folder is as easy as dragging it to the place you want it to be. This system speeds up the management process and stimulates the proper classification of files.
3. Move a document to another folder
If you want to move a document to another folder you have two options:
If the folder is inside the same category in which the document is located: If you are in this situation you can drag and drop the file to the target folder and then release it. It would be placed inside immediately
If the folder is not inside the category in which the document is located: If the target folder is not visible, you can move the document by clicking the right button and the Move tab, then a new screen will appear and there we will be able to select the target folder
4. How to delete a document
If there’s a document already uploaded to the platform and you want to delete it, click on the right button and select the Delete tab.
5. Edit files’ properties
It can be done from the Documents tab on the administration web portal’s top menu, where you can find listed all the documents uploaded to the application. You can change the following aspects of a document:
- The cover
- The name
- The permits
- The category or folder to which it belongs
- Its User Groups
- The related documents it has
From this screen you can modify the aforesaid aspects just by clicking on the one you want to edit.
If you want to delete different documents at the same time you can do it by selecting them and deleting them clicking on the Action section located on the upper-left of the screen.


Leave A Comment